Here is a little discussion about making custom brushes for PhotoShop. Actually, this is about several things, but I thought I would focus more on making brushes since it's a topic frequently asked about (at least in my travels).
I'm not going to talk about brush management. Personally, I think PS's brush management is lacking, but that's a rant for another day. I'm also going to assume you know how to make a Rectangular selection and use Edit > Define Brush.
For simple brushes, it's amazing how far a few black splotches and the Smudge tool will take you.
You can even use filters like Mezzotint or something. You know those funny little filters that you never use? Well, try them and see what happens.
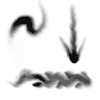
Speaking of Mezzotint, here is an example of a stinky texture to make brushes.
On the left, I used Mezzotint and a few other simple tricks to make something messy. Then I used some fun techniques to cull around 15 brushes. After that, I did some sloppy painting.
I actually kind of like the brushes that I made from that texture. Any time I want that look or feel, I grab them and paint away. Very cool.
Pretty much anybody can make a stinky texture. It's not that hard with all of those filters. Mix it up and get wanton. No real need to talk about doing such things.
Since this is about making brushes and anybody can make a random texture, let's focus on making brushes from a photograph. Besides, this give me a lot more to talk about - more nuggets of joy to pass along.
So, we begin with a photograph. Any old photo will do. Personally, I prefer photos of dirt, gravel, trees, and shrubbery. I have been known to dabble with photos of hair, finished wood, doilies, rugs, water, heavy machinery, old buildings, and everything else under the sun.
Got a photo or two? Good. Let's get busy..
The easiest method for using a photograph is to run Image > Adjust > Threshold. Maybe clean it up with some airbrushing, smooth out some of the rough edges, and you're good to go.
But Threshold is so harsh, isn't it? I usually opt for Image > Adjust > Levels (ctrl + l) as it offers a more control. It's also a good idea to convert a colour photo to greyscale before using Levels. Since brushes are greyscale, converting to grey first will give a better visual indication of how your custom brush will look.
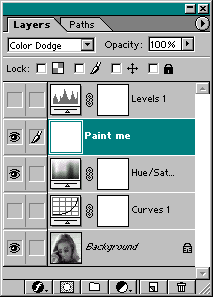
That brings me to converting a colour photo to greyscale. Things are going to get a bit tricky here, and I'm going to start talking about Adjustment Layers. Ready?
This is a cool little trick passed down to me by a photographer buddy of mine. This is a great way of converting a colour photograph to greyscale. Open your photo in PS. Add an HSV Adjustment Layer and bring Saturation all the way down. Tada! Instant greyscale, but some of the contrast between colours can be lost. To fix it, use a Curves Adjustment Layer *between* the photo and the HSV Adjustment Layer. Not only does the Curves give you control over the contrast, but you can tweak the contrast in the seperate RGB (or CMYK) channels. Did you catch that?
Okay, start with a photo of some clouds. Nice white clouds and a nice blue sky. When such a photo is converted to greyscale, chances are pretty good that there isn't enough contrast. You could adjust the contrast after the fact, but a great deal of control is lost in doing so. Enter Curves. With Curves, you can tweak the contrast seperately in the Green and Red channels, thus pumping up the contrast for the greyscale. Woo!
Works great as a stand-alone technique. Can really work wonders when converting flesh tones to greyscale. And, because of using Adjustment Layers, you can paint areas out if your adjustment layers that are too harsh for some areas of the canvas.
What does this have to do with making custom brushes from a photo? Well, brushes are greyscale, and having this kind of control over converting colour to greyscale is a *major* bonus.
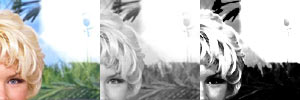
Ah, but chances are you don't want to turn a whole photo into a brush -- just select bits and pieces of it. Right? Thought so. Enter Colour Dodge. Bah! Rather than explain this in it's entirety, I'll just run you through setting this up.
Grab a photo. Add your Curves Adjustment Layer and HSV Adjustment Layer in the proper order (don't forget to bring Saturation down all the way down in the HSV Layer). On top of all this, add a new layer, fill with white, and set the Blending Mode to Colour Dodge.
At this point, everything should look white. Wah? Well, the Colour Dodge Layer is for painting on with black. I use Airbrush set to about 25%. If you want a part to show, paint with black. If you want to hide something that you don't like, paint with white. It's easy and pretty neat to be able to paint a new custom brush in this manner. It's kind of like sculpting.
I usually add a Levels Adjustment Layer to top off all of this. Woah, even more control (normally I would use another Curves, but Levels is enough control for me at this point). Sometimes I'll run a slight Gauss on the photo if the edges are too harsh.
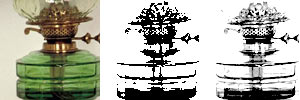
In the end, it looks a little something like this:
5) Adjustment Layer > Levels. Tweak to taste.
4) Layer filled with white and set to Colour Dodge -- this is the layer that is painted on (Airbrush ~25%).
3) Adjustment Layer > HSV with Saturation all the way down.
2) Adjustment Layer > Curves. Tweak to taste, in seperate channels if necessary.
1) Photo, sometimes with a light Gauss.
I have an Action that I recorded that sets all this up for me for when I'm in the mood to play around. Pretty damn spiffy, and a quick way to make custom brushes. With all of the tweakability, quite a few brushes can be made from the same photo. The really cool thing is that Edit > Define Brush works on Merged -- gotta love that.
Time to tie up some loose ends. Let's chat about that Dodge layer a bit, eh?
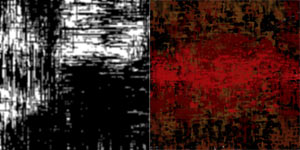
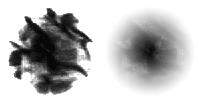
Here we have a picture of some pool water that I inverted. On the Dodge layer, I dropped a Radial Grandient with black in the middle - that's on the left. Then, I changed the blending mode to Screen - that's on the right.
I'm assuming you can see the difference. I prefer Dodge over Screen. Sometimes I'll check to see what it looks like with Screen, but those times are few and far between.
Sometimes, when you get it all set up, there will be artifacts showing through the Colour Dodge layer. This is because pixels on the photo are pure black. The easiest way to get rid of these artifacts is to change the Colour Dodge layer to Screen. However, I like Colour Dodge over Screen because it's softer, so to speak (see above).
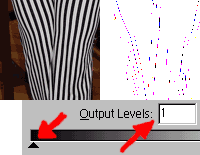
The way I use to get rid of the artifacts is to run Levels (ctrl + l) on the photo real quick. Change the Output from 0 to 1 and the artifacts disappear. Problem solved with next to no damage done to the photo. Doing so isn't always necessary, but this is a part of my Action anyways. If you don't want it in the Action, just turn it off. No big deal.
Another way of getting rid of artifacts is to use the Curves Adjustment Layer. Just bring the lower-left corner up to 1 (Output: 1). Again, no big deal. Since I don't always use the Curves Adjustment Layer, this little tweak won't be a part of the Action (but the Curves Ad-Layer will be created).
If you do Gauss the photo, you might have to fix artifacts again with Levels. For some reason, that doesn't make sense. Don't ask because I don't know.
One of my favorite things is to use Gradients on the Colour Dodge layer. Set the colours to Default (d), set the Gradient tool mode to Multipy, and fiddle away. I like using the Reflected Gradient for quick and sleazy spiderweb-ish lines.
Sometimes I use this for quick messy things to be dropped into other works. That is, I don't make a brush, but an element for another work. Make a selection, Copy Merged (ctrl + shift + c), go to other doc, Paste (ctrl + v), set Blending mode to Multiply or something.
I do have an Action that I use for this. I'm going to record a new one that fits more with what I've been talking about. Just open a photo, run the Action, and fiddle to your heart's content. Several Adjustment Layers will be created, but not all of them will be turned on. Once you understand the ideas behind all of this, I recommend that you record your own Action so things will be set up the way you want them.
Lots of fun things can be done. I don't think I'll ever get tired of playing with this.
Brushes are only one side of the coin. The other side is colour use. If you would like some tips on colours, give Picking Colours a read. The third side of the coin is actually painting something.